Showing posts with label homemade. Show all posts
Showing posts with label homemade. Show all posts
1.29.2011
8.20.2010
Finish Object Friday: Readers' Wreath
8.10.2010
Lil' Girl's Nursery: A Photo Tour
 | |
| Lil' White Bird from mobile. |
 |
| Other Lil' Birds on mobile. |
 |
| Mobile from Lil' Girl's perspective. |
 |
| From Daddy's perspective. |
 |
| From Momma's perspective. |
 |
| ABC's by momma. |
 |
| Changing table - daddy painted it. |
 |
| Reading corner. Thanks daddy for the pretty blue table. Thanks Nana and Pop for the glider. |
 |
| Baby's crib. |
 |
| Lil' houses for Lil' birds. |
 | |
| Moses basket in the reading corner. |
 |
| Daddy's wall of gear: Bjorn, sling, and diaper bag. |
8.04.2010
Nursery Library Necessities
We like books in this family, which is more than evident by the three completely filled, floor to ceiling bookcases in our guest room - as well as the fact that most of our furniture is hosting some kind of literary guest. This means, baby girl is gonna have books.
With limited space in a nursery, no spare bookcases, and a desire to stay within our budget, we have been forced into ingenuity and "make-it-workedness." Enter the nursery's library.
I like using books as decor. So, I thought it was obvious that lil' one's dresser would sport some written word. But, books are slippery beasts and I have no desire to wake a sleeping newborn with the crash of several Dr. Seuss renditions on the floor. We have some bookends in the casa, but nothing suitable for a nursery (marble horse heads = trip to the ER and possible DEFACS visit). So, I whipped up some canvas bookends - which are basically giant bean bags, but do a great job of keeping those books in their proper place. I chose to hand embroider these with one of Matt's favorite quotes from one of his favorite books.
Next, we decided to make a hanging bookshelf - as seen here. We, however, encountered the small problem of not really being able to nail anything into our walls. Our lil' rental has plaster walls and we just don't want to risk a giant hole (in the wall and our wallet). So, using the handy-dandy picture railing found through the house - we made our own version. It consists of three fabric shelves and holds a total of 40-50 pounds. Not bad for what equated to an hour's worth of work and it serves as wall decor.
Thought of the day: Functional and pretty is really the way to go....oh, and handmade.
7.31.2010
DIY: Cloth Wipes
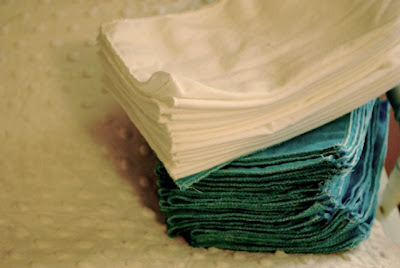
If you are going to venture into sing cloth diapers, you might as well bite the bullet and use cloth wipes. They aren't really going to "add" to the laundry any....and they are budget and earth friendly.
I made mine last night (for free), a big thanks to ye' 'ol Purple Martin fabric stock. Sure do miss my business. Anyhow. It was too easy. Get some flannel, cut it to the size you would like (I chose 8x10 rectangles) , serge the edges. Done and Done.
5.02.2009
Finished: Apron with a dash of sass

I finished this apron about 2 weeks ago. As you know, we're trying to sell our house and I have to say that I felt really awkward about the possibility of folks looking into my office and onto my dress-less dress form. So, I did what any rational home-seller would do and made something pretty for it to wear.
Of course, this project has been in my head for about a year, but a naked dress-form is good motivation. I made my pattern and finished it in a day. So feminine, so pretty, so fun...and as always, I learned a ton. I will definitely tweak the pattern next-go-round. I'm contemplating adding a pocket with my initial...but I might just save that for my next project.
Stay-tuned for the pattern and a tutorial!
4.26.2009
Homemade Beauty - skincare

I've been dabbling in homemade skincare for a while now. I'll usually try something out once or twice and then let it fall by the wayside. However, in the current cash crunch that most of the world is feeling, I felt that now more than ever is a great time to save some some dough and be more eco-conscious at the same time.
I've been unhappy with my skincare regime for the past few
So, this week's wonder product: HONEY. I think honey has really been underestimated for some time now. I loved it as a kid - en mis sopapillas y el pan toastado; however when I entered my double digits, honey went underground. Refined, white, sugar became mode. I'm happy to say that honey is making a comeback. Not only is it a great healthy, natural sweetener that can be used in all sorts of culinary creativity, it is a wonderful beauty essential.
I've heard whispers of the magnificence of honey for the skin, but have never thought the rumors worthy of smearing that sticky stuff on my face. It's worth it, ladies. I've been doing a honey mask nightly for the past three days (as a bit of a "gitty-up and go" for my skin) and I'm in love with the results. My skin seems brighter, softer, and a wee bit tighter.
Simple Honey Masque:
1. Open your pores with a warm compress.
2. Apply a thin coat of honey to your face - even around your eyes.
3. Let it do i's thing for 30 minutes.
4. Rinse with warm water.
5. follow with a few splashes of cold H2O to close those pores up.
1. Open your pores with a warm compress.
2. Apply a thin coat of honey to your face - even around your eyes.
3. Let it do i's thing for 30 minutes.
4. Rinse with warm water.
5. follow with a few splashes of cold H2O to close those pores up.
Organic honey is best, but non-organic brands will work as well - just make sure it's real honey. Enjoy your home facials ladies (& gentleman).
Subscribe to:
Posts (Atom)


